Thursday, July 21, 2011

How to Find a Group on Facebook for The Names Game

*NOTICE* It is important to accurately follow every step of this tutorial. It's easy to accidentally join something other than a Facebook Group, but only Facebook Groups will work with The Names Game. This tutorial will make sure that you join only what will work with The Names Game. *NOTICE*


After logging into Facebook, write the name of the group that you are searching for into the "Search" textfield at the top of the page:


It is important that you then click the Magnifying Glass next to the textfield after you have entered the name of the group that you are searching for. If you press "Enter" on your keyboard instead then you have messed up and you should start over:


After clicking the Magnifying Glass, you will be taken to a list of items that are related to what you entered into the textfield:


We are only interested in Groups for The Names Game, so we need to filter this list down to just Groups. Look at the left hand side of the page and click the "Groups" button:


Now that you are only viewing groups, read through the list and find the group that you want to use. If you don't see the group you are looking for, you may need to click the "See More Results" button at the bottom of the list to view more Groups:


Once you have found the Group you are looking for, click "Join Group". If it is a closed group then there will be a "Request to Join" button instead. If there is a "Request to Join" button then click it and you will have to wait until an administrator of that group accepts you as a member.

Keep in mind that The Names Game can only store 500 members since it stores Pictures as well as Names, so make sure that the group you are planning to add has less than 500 members. And if you plan on adding more than one Group to The Names Game then make sure that the group you plan on adding has far fewer than 500 members. 

Now that you have joined the group (if it was open and there was a "Join Group" button, or if an administrator accepted you into a closed group), you can load the group onto The Names Game. Open The Names Game app and click the "Setup" button in the bottom right hand corner of the screen. Scroll to the group that you joined and then click the big green "GO!" button right beneath the list of groups.

After the group has been downloaded to The Names Game, click "Game" to play games with the members of the group, or click "Roster" to view the members of the group.


How To Create a Group on Facebook for The Names Game

After logging into Facebook, click the "Home" button which is in the top right hand corner of the page:


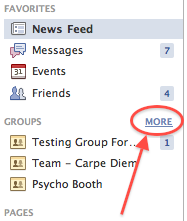
Once the page has loaded, look at the left hand side of the page for the "Group" section. If you hover your mouse cursor over the group section then a "More" button will appear. Press the "More" button:


When you press the "More" button, all of your groups will be shown in the center of the screen. In the top right hand corner of this screen is a "Create Group" button. Press the "Create Group" button.


After selecting "Create Group...", a pop-up box will appear: 


Fill in the Group Name textfield with the name you would like to call your group: 


In order to create the group, you NEED to enter the name of at least one of your friends in the Members textfield: 


Just begin typing a friend's name, and Facebook will automatically list all of the names that start with the characters that you have entered. Click a name and it will be added. You can begin typing again and add another name:


It is advisable to add at least 4 names to the group because in order to use all of the game types in The Names Game you need at least 5 members, and since you are automatically a member of your group, if you invite 4 people then you will have 5 members: 


The last thing you need to do is pick your privacy setting for the group: 


Since you want people to be able to join your group so that you can learn their names, it would probably be best to set your privacy to open. Just click the privacy button (which says "Closed" by default) and then select your setting:


Now all that is left to do is to click the "Create" button and you have a group ready to use with The Names Game:


 After clicking the "Create" button, Facebook will automatically take you to your new group. 

At this point your group is ready to be used on The Names Game. Just open The Names Game app and click the "Setup" button in the bottom right corner of the screen. Scroll to the group name that you just created (it may take a few seconds for your group to show up on The Names Game, but as long as you have an internet connection, it will show up) and then press the big green "GO!" button and you will start loading it to The Names Game.

Once the group has been added, press the "Game" button to play games with the members of that group, or press the "Roster" button to view the members of the group.